Simplest Sample: Control a Cube
This sample shows you how to create your own project and control the pose of a cube.
Contents |
Prerequisites
- The controller (or emulator) is connected to the device.
- Import both wavevr.unitypackage and sample.unitypackage into your Unity projects.
Project content
After you create a Unity project, there are two default GameObjects: Main Camera and Directional Light. Let them be the default value.
Drag and drop [WaveVR] into your scene.
- [WaveVR] and WaveVR is prefabs in Assets/WaveVR/Prefabs, they are used to initialize the Wave Unity SDK. To use Wave Unity SDK, you’ll need to add prefab [WaveVR] or WaveVR into your scene.
- WaveVR is a [WaveVR] with a camera.
Here we are going to use the default Main Camera in this project, so we choose the prefab [WaveVR] instead of WaveVR.
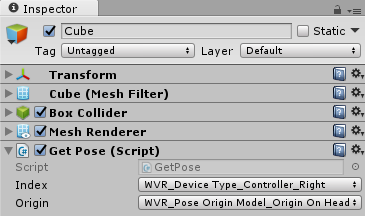
- Create a cube by mouse right-click on [WaveVR] > 3D Object > Cube.

Add a new component Get Pose.
- GetPose.cs is in Assets/Samples/GetPose
Note
If you’re stuck, check the full sample scene in Assets/Samples/GetPose/GetPose.
- Build an Android APK through File -> Build Settings.
Click on Build and save the APK.
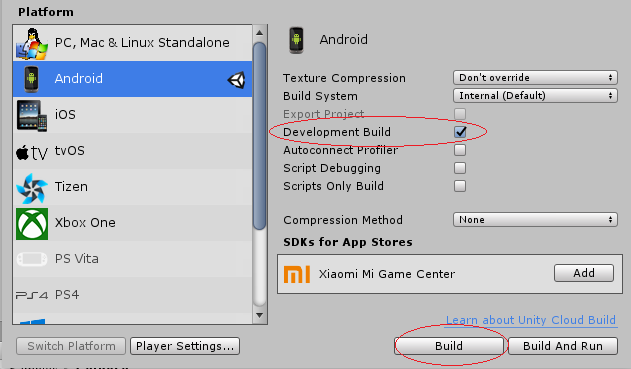
After installing and executing the APK in your Android device, you will see a cube onscreen that can be controlled by the controller (or emulator).
Scripts
The GetPose.cs script has two public parameters:
Index: The index of connected controller (or emulator) containing the HMD, right controller, and left controller.
Origin: The origin of the view. There are three sources: on head, on ground, and on tracking observer.
The code of the script is shown below.
Interop.WVR_GetSyncPose((uint) origin, poses, (uint) poses.Length);

for (int i = 0; i < poses.Length; i++)
{
    if (poses[i].type == index && poses[i].pose.IsValidPose)
    {
        rtPoses [i].update (poses [i].pose.PoseMatrix);
        updatePose (rtPoses [i]);
        break;
    }
}
It calls Interop.WVR_GetSyncPose to get poses. Check the pose type and whether the pose is valid.
Then, update the position and rotation of rtPoses (which has type WaveVR_Utils.RigidTransform) by calling update function.